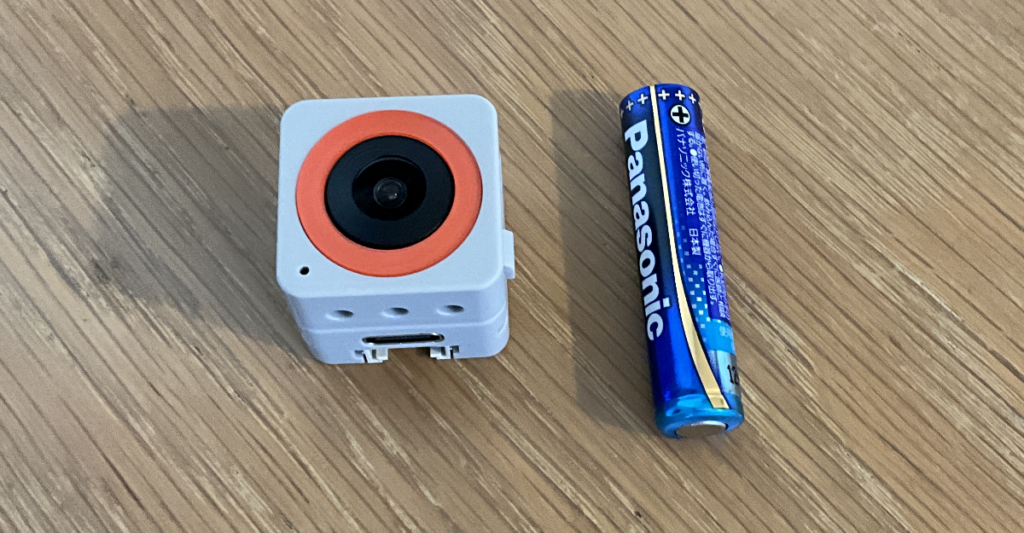
ATOMS3R M12カメラキット(OV3660)を使ってみた。
小さい。単四電池と比べてみたらどのくらい小さいかわかる(24×24×23.8m)。
※オフィシャルサイトのサンプルコードが更新されていたので、一部修正コードを変更した。2025-10-6
※ArUcoマーカー検出:USB接続→OK, Wi-Fi接続→NG。2025-10-6
USB接続
オフィシャルサイトには、「工場出荷時のファームウェアには、UVC 機能と Wi-Fi 送信機能の両方が含まれています」との記載。
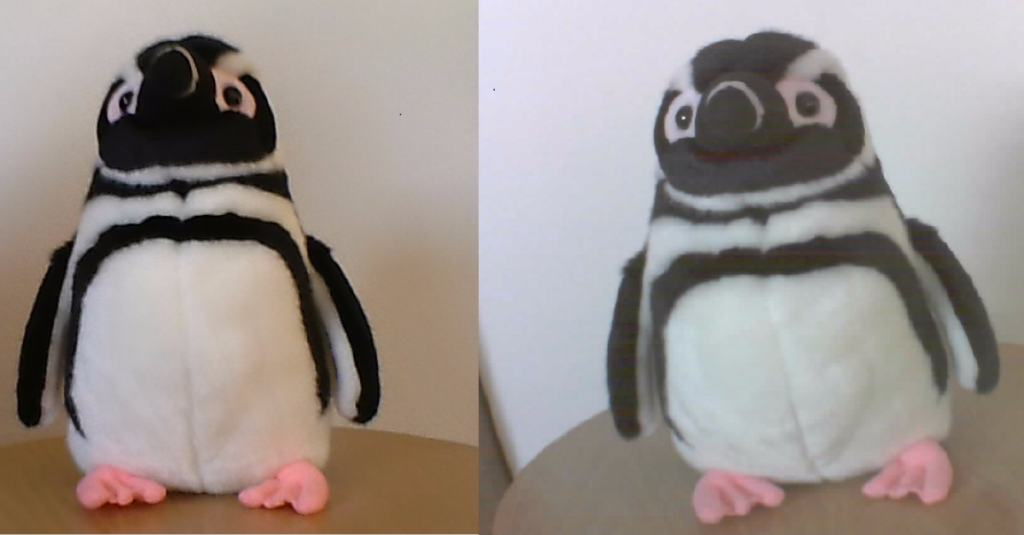
USB接続の画像が下の画像(右)。比較のための左の画像は、DELL Inspiron 15 3535のカメラ(0.92 メガピクセル)で撮影したもの。
Wi-Fi 接続
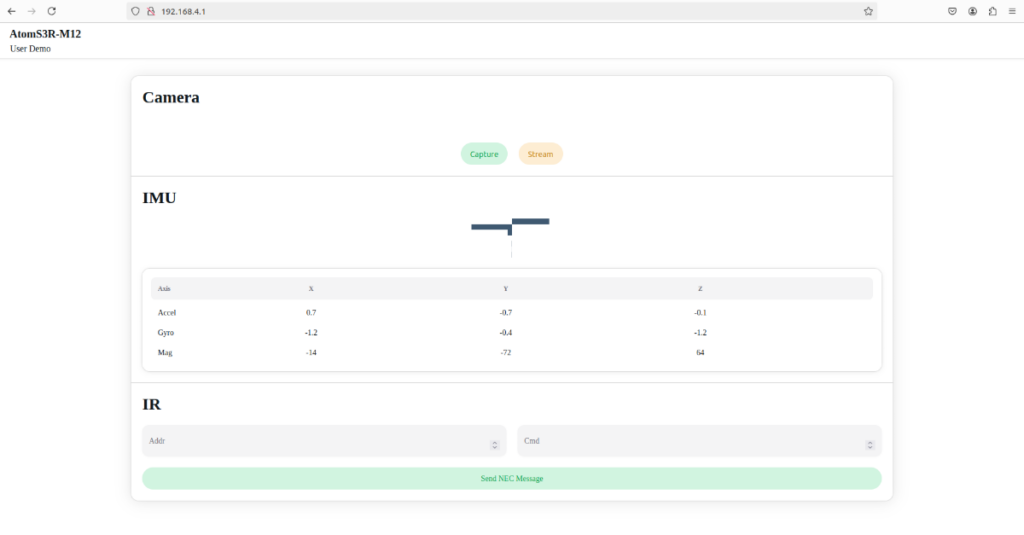
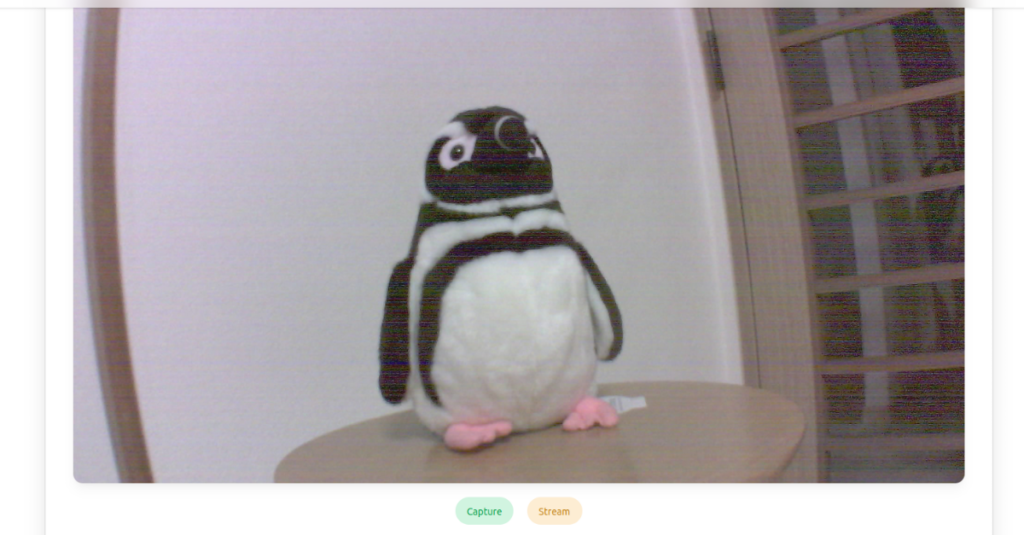
Wi-Fi 送信機能で接続してみる。PCのSSID「AtomS3R-M12-WiFi」に切り替え、192.168.4.1に接続した画面が下の画像。「Screen」ボタンを押すと、カメラ画像が表示される。なぜかWindows11からは接続できず、Ubuntuからは接続できた。どうしてWindows11から接続できないかは分かっていない。
上記は「工場出荷時の状態」を使った内容である。次のステップは自宅のルーターに接続することである。
参照サイト
- オフィシャルサイト
- M5AtomS3Rカメラキットを使ってみた
- 【M5Stack】カメラに映った動画をリアルタイム表示(ATOMS3R + Camera Kit x ESPNowCam)
- ATOMS3R M12を工場出荷時のファームウェアに戻すメモ
- M5Stack ATOMS3を購入
ステーションモードでWi-Fiアクセスポイントに接続する
「工場出荷時の状態」では、ルーターに接続していないので実用的でない。この製品の唯一のオフィシャル例題を使ってルーターに接続する。
環境設定
例題プログラムを利用するためのArduino IDE環境設定は、オフィシャルページの通りに実施すればよい。ここではGOODMINI2のArduino IDEバージョン2.3.4を使用した。
 Arduinoボード管理
「ファイル」→「基本設定」→「追加のボードマネージャのURL」に下記を入力する。
https://static-cdn.m5stack.com/resource/arduino/package_m5stack_index.json

サイドバーで「Board Manager」を選択し、検索欄に「M5Stack」を入力する。
表示された「M5Stack by M5Stack」のインストール・ボタンをクリックする。

メニューバーから以下の順に選択し開発ボードを設定する。
「ツール」→「ボード」→「M5Stack」→「M5AtomS3」

 Arduino ライブラリ管理
サイドバーから「Library Manager」を選択する。
検索フィルターに「M5AtomS3」を入力する。
表示された「M5AtomS3 by M5Stack」のインストール・ボタンをクリックする。
依存関係として他のライブラリをインストールするように求められた場合は、Install Allボタンをクリックする。

 AtomS3 プログラムのコンパイルとアップロードはサイトの説明の通り。
本体横のボタンを押してダウンロードモードするところがポイント
カメラの例題プログラムに修正を加える。
例題プログラムに2点の修正を加える。具体的な修正箇所はソースコードを参照。
.frame_size = FRAMESIZE_VGA, // 640×480
AGC, 露出, コントラス, トシャープネスの設定 —– 130行辺り
動作確認
ブラウザで192.168.0.105にアクセスする。
Arduino IDEのコード — ATOMS3RM12_Basic_mod.ino
/*
 * プログラム名: ATOMS3RM12_Basic_mod.ino
 * 更新日付: 2025-10-06
 * 処理概要:
 * M5StackのATOMS3R M12用基本コードに、OTA(Over-The-Air)アップデート機能と、
 * カメラの画質パラメータ(ゲイン、露出、ホワイトバランス等)を規定値に設定する機能を追加したもの。
 * 元のサンプルプログラムの出所: M5Stack
 */

/**
 * @Hardwares: AtomS3R-CAM / AtomS3R-M12
 * @Platform Version: Arduino M5Stack Board Manager v2.1.4
 */

// -------------------------------------------------------------------------
// ライブラリのインクルード
// -------------------------------------------------------------------------
#include "camera_pins.h"  // カメラモジュールのピン定義を読み込むヘッダーファイル
#include <WiFi.h>         // Wi-Fi機能を使用するためのライブラリ
#include "esp_camera.h"   // ESP32用カメラドライバライブラリ
#include <ArduinoOTA.h>   // ▼▼▼ 2025-10-06 OTA対応のため追加 ▼▼▼

// -------------------------------------------------------------------------
// コンパイル時の設定 (使用するハードウェアやモードを選択)
// -------------------------------------------------------------------------
// #define USE_ATOMS3R_CAM // 標準レンズ版を使う場合はこちらを有効化
#define USE_ATOMS3R_M12   // M12レンズ版を使う場合はこちらを有効化

#define STA_MODE          // Wi-Fi子機モード(ルーターに接続)
// #define AP_MODE        // Wi-Fi親機モード(本機がアクセスポイントになる)

// -------------------------------------------------------------------------
// グローバル変数・定数の定義
// -------------------------------------------------------------------------
// --- Wi-Fi設定 ---
const char* ssid     = " ";   // 接続するWi-FiのSSID
const char* password = " ";    // Wi-Fiのパスワード

// --- 固定IPアドレス設定 ---
IPAddress local_IP(192, 168, 0, 105);      // 本機に割り当てるIPアドレス (*** 2025-10-06 修正 ***)
IPAddress gateway(192, 168, 0, 1);       // ルーターのIPアドレス (*** 2025-10-06 修正 ***)
IPAddress subnet(255, 255, 255, 0);      // サブネットマスク (*** 2025-10-06 修正 ***)
IPAddress primaryDNS(192, 168, 0, 1);      // DNSサーバーのIPアドレス (*** 2025-10-06 修正 ***)

// --- Webサーバー/カメラ関連 ---
WiFiServer server(80);      // Webサーバーをポート80 (HTTP)で起動
camera_fb_t* fb    = NULL;  // カメラのフレームバッファ(撮影した画像データ)を指すポインタ
uint8_t* out_jpg   = NULL;  // JPEGに変換後のデータへのポインタ
size_t out_jpg_len = 0;     // JPEGデータのサイズ

// --- プロトタイプ宣言 ---
static void jpegStream(WiFiClient* client); // JPEGストリーミング配信を行う関数

// -------------------------------------------------------------------------
// カメラの初期設定
// -------------------------------------------------------------------------
static camera_config_t camera_config = {
    // --- カメラモジュールのピン接続設定 ---
    .pin_pwdn     = PWDN_GPIO_NUM,
    .pin_reset    = RESET_GPIO_NUM,
    .pin_xclk     = XCLK_GPIO_NUM,
    .pin_sscb_sda = SIOD_GPIO_NUM,
    .pin_sscb_scl = SIOC_GPIO_NUM,
    .pin_d7       = Y9_GPIO_NUM,
    .pin_d6       = Y8_GPIO_NUM,
    .pin_d5       = Y7_GPIO_NUM,
    .pin_d4       = Y6_GPIO_NUM,
    .pin_d3       = Y5_GPIO_NUM,
    .pin_d2       = Y4_GPIO_NUM,
    .pin_d1       = Y3_GPIO_NUM,
    .pin_d0       = Y2_GPIO_NUM,
    .pin_vsync    = VSYNC_GPIO_NUM,
    .pin_href     = HREF_GPIO_NUM,
    .pin_pclk     = PCLK_GPIO_NUM,

    // --- カメラの動作設定 ---
    .xclk_freq_hz = 20000000,    // カメラへのマスタークロック周波数 (20MHz)
    .ledc_timer   = LEDC_TIMER_0,
    .ledc_channel = LEDC_CHANNEL_0,

// --- カメラごとの画像フォーマットと解像度設定 ---
#ifdef USE_ATOMS3R_CAM
    // 標準レンズ版の場合
    .pixel_format = PIXFORMAT_RGB565, // 非圧縮の生データ形式で取得
    .frame_size   = FRAMESIZE_QVGA,   // 320x240
#endif

#ifdef USE_ATOMS3R_M12
    // M12レンズ版の場合
    .pixel_format = PIXFORMAT_JPEG,   // カメラ側でJPEG圧縮済みの形式で取得
    .frame_size   = FRAMESIZE_VGA,    // 640x480 (UXGAから変更)
#endif

    // --- 共通の画質・メモリ設定 ---
    .jpeg_quality  = 10,  // JPEG圧縮品質 (0:最高画質, 63:最低画質)
    .fb_count      = 2,   // フレームバッファの数 (2にするとダブルバッファリングが有効になりスムーズになる)
    .fb_location   = CAMERA_FB_IN_PSRAM, // フレームバッファをPSRAMに確保 (必須)
    .grab_mode     = CAMERA_GRAB_LATEST, // 常に最新のフレームを取得するモード
    .sccb_i2c_port = 0,
};


// =========================================================================
// setup() - 初期化処理
// =========================================================================
void setup()
{
    // シリアル通信の開始 (デバッグメッセージ用)
    Serial.begin(1152200);

    // カメラモジュールの電源をONにする
    pinMode(POWER_GPIO_NUM, OUTPUT);
    digitalWrite(POWER_GPIO_NUM, LOW);
    delay(500);

    // カメラを初期化
    esp_err_t err = esp_camera_init(&camera_config);
    if (err != ESP_OK) {
        Serial.println("Camera Init Fail"); // 失敗したら再起動
        delay(1000);
        esp_restart();
    } else {
        Serial.println("Camera Init Success");
    }

    // ▼▼▼ 2025-10-06 カメラの画質パラメータを設定(規定値)▼▼▼
    // センサーのインスタンスを取得
    sensor_t * s = esp_camera_sensor_get();
    if (s != NULL) {
        s->set_gain_ctrl(s, 1);      // 自動ゲインコントロールを有効化 (ON)
        s->set_exposure_ctrl(s, 1);  // 自動露出コントロールを有効化 (ON)
        s->set_whitebal(s, 1);       // 自動ホワイトバランスを有効化 (ON)
        s->set_saturation(s, 0);     // 彩度を中間値 (0) に設定
        s->set_contrast(s, 0);       // コントラストを中間値 (0) に設定
        s->set_sharpness(s, 0);      // シャープネスを中間値 (0) に設定
        Serial.println("Camera sensor settings set to defaults (Auto).");
    }
    // ▲▲▲ 2025-10-06 ここまで ▲▲▲

    delay(100);

// --- Wi-Fi接続処理 ---
#ifdef STA_MODE
    // Wi-Fiをステーション(子機)モードに設定
    WiFi.mode(WIFI_STA);

    // *** 2025-10-06 for fixed IP Address ***
    // 固定IPアドレスを設定
    if (!WiFi.config(local_IP, gateway, subnet, primaryDNS)) {
      Serial.println("STA Failed to configure");
    }

    // Wi-Fiアクセスポイントへ接続開始
    WiFi.begin(ssid, password);
    WiFi.setSleep(false); // スリープモードを無効化
    Serial.println("");

    Serial.print("Connecting to ");
    Serial.println(ssid);

    // 接続が完了するまで待機
    while (WiFi.status() != WL_CONNECTED) {
        delay(500);
        Serial.print(".");
    }

    Serial.println("");
    Serial.print("Connected to ");
    Serial.println(ssid);
    Serial.print("IP address: ");
    Serial.println(WiFi.localIP());
#endif

// --- アクセスポイントモードの処理 ---
#ifdef AP_MODE
    if (!WiFi.softAP(ssid, password)) {
        log_e("Soft AP creation failed.");
        while (1);
    }
    // ... (APモード時の情報表示)
#endif

    // ▼▼▼ 2025-10-06 OTA対応のため追加 ▼▼▼
    // OTAアップデートサービスの初期化と開始
    ArduinoOTA.begin();
    Serial.println("OTA Ready");
    // ▲▲▲ 2025-10-06 ここまで ▲▲▲

    // Webサーバーを開始
    server.begin();
}

// =========================================================================
// loop() - メインループ
// =========================================================================
void loop()
{
    // ▼▼▼ 2025-10-06 OTA対応のため追加 ▼▼▼
    // OTAのアップデート要求がないか常にチェックする
    ArduinoOTA.handle();
    // ▲▲▲ 2025-10-06 ここまで ▲▲▲

    // Webブラウザなどからの新しいクライアント接続を待つ
    WiFiClient client = server.available();
    if (client) { // クライアントが接続してきたら
        while (client.connected()) { // 接続が維持されている間ループ
            if (client.available()) { // クライアントからデータが送られてきたら
                // 映像ストリーミング処理を開始
                jpegStream(&client);
            }
        }
        // 接続が切れたらクライアントを停止
        client.stop();
        Serial.println("Client Disconnected.");
    }
}

// =========================================================================
// jpegStream() - JPEG映像をストリーミング配信する関数
// =========================================================================

// --- MJPEGストリーム用のHTTPヘッダー定義 ---
#define PART_BOUNDARY "123456789000000000000987654321"
static const char* _STREAM_CONTENT_TYPE = "multipart/x-mixed-replace;boundary=" PART_BOUNDARY;
static const char* _STREAM_BOUNDARY     = "--" PART_BOUNDARY "\r\n";
static const char* _STREAM_PART         = "Content-Type: image/jpeg\r\nContent-Length: %u\r\n\r\n";

static void jpegStream(WiFiClient* client)
{
    Serial.println("Image stream start");
    // --- ブラウザにHTTPヘッダーを送信 ---
    client->println("HTTP/1.1 200 OK");
    client->printf("Content-Type: %s\r\n", _STREAM_CONTENT_TYPE);
    client->println("Content-Disposition: inline; filename=capture.jpg");
    client->println("Access-Control-Allow-Origin: *");
    client->println();
    static int64_t last_frame = 0;
    if (!last_frame) {
        last_frame = esp_timer_get_time();
    }

    // --- 映像フレームを連続で送信する無限ループ ---
    for (;;) {
        // ▼▼▼ 2025-10-06 OTAポーリングのためjpegStreamを抜ける処理を追加 ▼▼▼
        // クライアントの接続が切れたらループを抜ける
        if (!client->connected()) {
            break;
        }
        // ▲▲▲ 2025-10-06 ここまで ▲▲▲

        // カメラから1フレーム取得
        fb = esp_camera_fb_get();
        if (fb) { // フレーム取得に成功したら
// --- カメラ機種ごとのデータ取得処理 ---
#ifdef USE_ATOMS3R_CAM
            // 標準CAMの場合、RGBデータをJPEGに変換する
            frame2jpg(fb, 255, &out_jpg, &out_jpg_len);
#endif

#ifdef USE_ATOMS3R_M12
            // M12の場合、既にJPEGなのでポインタを直接代入する
            out_jpg     = fb->buf;
            out_jpg_len = fb->len;
#endif

            Serial.printf("pic size: %d\n", out_jpg_len);
            // --- 取得したJPEGデータをクライアントに送信 ---
            client->print(_STREAM_BOUNDARY);
            client->printf(_STREAM_PART, out_jpg_len);

            // データを8KBずつのパケットに分割して送信
            int32_t to_sends    = out_jpg_len;
            uint8_t* out_buf    = out_jpg;
            while (to_sends > 0) {
                size_t now_sends = to_sends > (8*1024) ? (8*1024) : to_sends;
                if (client->write(out_buf, now_sends) == 0) {
                    goto client_exit; // 送信に失敗したら抜ける
                }
                out_buf += now_sends;
                to_sends -= now_sends;
            }

            // --- フレームレート計算・表示 ---
            int64_t fr_end     = esp_timer_get_time();
            int64_t frame_time = fr_end - last_frame;
            last_frame         = fr_end;
            frame_time /= 1000;
            Serial.printf("MJPG: %luKB %lums (%.1ffps)\r\n", (long unsigned int)(out_jpg_len / 1024),
                          (long unsigned int)frame_time, 1000.0 / (long unsigned int)frame_time);

            // --- メモリ解放処理 ---
            // フレームバッファを解放して次の撮影に備える (非常に重要)
            if (fb) {
                esp_camera_fb_return(fb);
                fb = NULL;
            }
#ifdef USE_ATOMS3R_CAM
            // 標準CAMの場合、JPEG変換で確保したメモリも解放
            if (out_jpg) {
                free(out_jpg);
                out_jpg     = NULL;
                out_jpg_len = 0;
            }
#endif
        } else {
            Serial.println("Camera capture failed");
        }
    }

client_exit: // 送信失敗時のジャンプ先
    // --- 終了時のメモリ解放処理 ---
    if (fb) {
        esp_camera_fb_return(fb);
        fb = NULL;
    }
#ifdef USE_ATOMS3R_CAM
    if (out_jpg) {
        free(out_jpg);
        out_jpg     = NULL;
        out_jpg_len = 0;
    }
#endif
    client->stop();
    Serial.printf("Image stream end\r\n");
}
ATOMS3RM12_Basic_mod.inoの場所
MINI2 C:\Users\%username%\Documents\Arduino\ATOMS3R_M12
工場出荷の状態に戻す
オフィシャルサイトの項目「イージーローダー」にあるダウンロードをクリックすると「AtomS3R-M12-Demo-V0.1.exe」がダウンロードされる。これを起動し、現れた画面のCOMを指定してから「Burn」をクリックすと初期状態に戻る。